This was originally written as a self attempt to better understand FP concepts like functors, applicatives, monads, etc. visually, by implementing them on images.
The source code is available here
This was inspired by Conal Elliott - Denotational Design: From Meanings To Programs
Defining images
This is very well explained in the presentation.
TL;DR we can say an Image is a function from location (x, y coordinates) to some value A. In order to have them rendered on the screen we need visual images which will be a function from location to a Color.
class Image[A](val im: Loc => A)
case class Loc(x: Double, y: Double)
where for our visual purposes A is of type Color
Functor
A functor is structurally composed of one thing:
A map function that takes another function f: A => B as argument, which is applied on the A value inside a F[A] context. Map will give back a F[B]. This allows transformation of the value in the context,
while leaving the context untouched. Of course, map needs to apply f on some F[A], so it has this argument as well:
def map(fa: F[A], f: A => B): F[B]
Usually in libraries there are syntax enhancements so that we call map directly on the F[A] like this
fa.map(f)
and this structure must obey two laws:
- composition
map(map(fa, f), g) == map(fa, f.andThen(g))
fa.map(f).map(g) == fa.map(f, f.andThen(g)) // enhanced syntax- identity - mapping with
identity = a => adoes not change the value
map(fa, identity) = fa
fa.map(identity) = fa //enhanced syntax
It is not enough to define functor by its structure (the existence of map) because we need the laws that define how that structure behaves. The example project is built with Cats and Cats provides tests so we can verify functor (and applicative, monad, etc) implementation against the laws.
checkAll("Functor Laws", FunctorTests(Image.imFunctor).functor[Int, Int, String])Functor on images
implicit val imFunctor: Functor[Image] = new Functor[Image] {
    override def map[A, B](fa: Image[A])(f: A => B): Image[B] = Image.lift1(f)(fa) //check project for this version
}

val imFunctorDirectly: Functor[Image] = new Functor[Image] {
    override def map[A, B](fa: Image[A])(f: A => B): Image[B] = new Image[B](loc =>
        f(fa.im(loc))
    )
}
So having implemented functor for images (check the code and presentation), what does this mean?
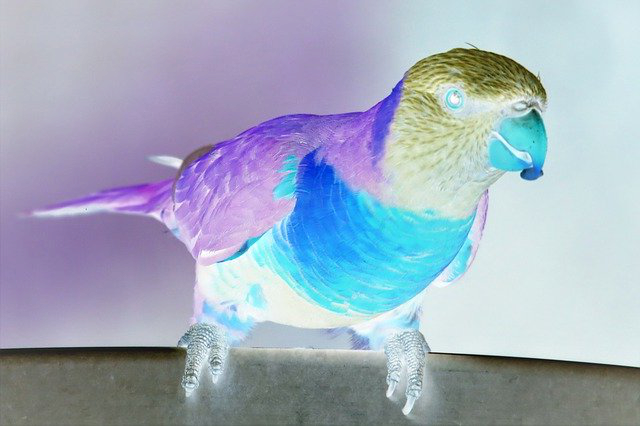
It means that given a source image, we can transform it into another, given a function Color => Color.
Notice that the function takes the original source Color and gives us another color based on that. So we can’t create ANY new image, but only derived ones from our original. If we want we can ignore the original Color but that limits us extremely, being then only able to return a constant Color.
So we take the image and with the help of map we transform it, pixel by pixel (since we
apply f to a Color, which is the value at a Location)
The transformations below are just one application of map with functions of type Color => Color,
but there is nothing stopping us to transform color into something else
like Color => Boolean, it’s just that we can’t render booleans to screen (for our visualization purpose it is not helpful), so we need
a second map transformation Boolean => Color, but then again due to function composition and functor’s composition law
we can compose the functions into a single one Color => Color.
Let’s see it in action.
original

grayscale colors
def brightness(c: Color): Float = (c.red + c.green + .c.blue) / 3

image.map(color => new Color(brightness(color), brightness(color), brightness(color), 1))
Replace colors - that specific dark red with green
img.map(c => if (c == DARK_RED) GREEN else c)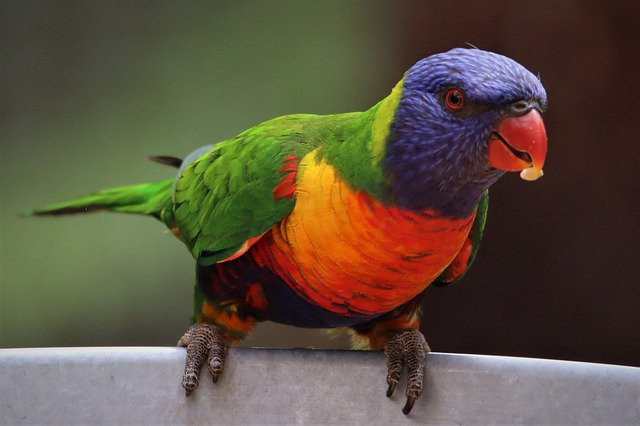
Threshold - if brightness over some value V then put White else put Black
img.map(c => if (brightness(c)) < 0.5) BLACK else WHITE)
Ignore the input color and return Green:
img.map(c => GREEN)
There are a lot more creative effects which one can do just by manipulating individual pixel colors. Beside the ones above you can find in the sample project implementations for: saturate, desaturate, invert colors, keep only one color channel (red / green / blue / alpha), swap colors. Of course many others useful effects can be done if one knows some color theory - which I don’t.
In the next post of this series we will see new effects done with the help of applicatives.